• HOME
  • TIME ATTACK
    • FEATURE CARS
    • BUILDS
  • STREET ATTACK
    • FEATURE CARS
    • PROJECTS
  • DRIVER POV
  • EVENTS
    • UPCOMING EVENTS
    • PREVIOUS EVENTS
  • ABOUT
  • CONTACT
  • #TIMEATTACKR
  • SHOP
TimeAttackR
  • HOME
  • TIME ATTACK
    • FEATURE CARS
    • BUILDS
  • STREET ATTACK
    • FEATURE CARS
    • PROJECTS
  • DRIVER POV
  • EVENTS
    • UPCOMING EVENTS
    • PREVIOUS EVENTS
  • ABOUT
  • CONTACT
  • #TIMEATTACKR
  • SHOP

StreetattackR: Goodbye Rodney, hello Civic Type R!

One of the hardest things I have ever had to do was sell Rodney. So, what do I have in the shed now?

It honestly feels like a lifetime since I sold the Altezza build. It was one of things situations where I got offered an epic amount of money for it, I couldn’t refuse. However, looking back, I am not sure I should have sold it, but that’s another blog entirely.

Since the sale of the Altezza, I have owned several different vehicles in the name of trying things out to see what fits. Directly after the Altezza, I bought a BMW 135i with an N55 engine and the famed dual-clutch transmission. It was a fun road car that I ended up modifying to around 300kW at the wheels. Still, not direct, nor was it raw to drive. Onto the next thing.

I bought a 555 STI which I restored and tidied up over lockdown. This kept me mostly out of trouble, as it was in the garage for most of its time with me. I then picked up an R56 Mini Cooper, with the absolutely shite N14 turbo engine. I upgraded the intercooler, installed Bilsteins, fitted new wheels and tyres, a downpipe, then had it tuned to around 160kW at the front wheels. It was incredibly fun, but it would never run properly. Painful.


Around the same time, I bought another V11 Subaru WRX STi hatch, with the EJ207 engine. Possum Bourne fitted their downpipe to it, a fuel pump and tuned it with ECUTek software and it churned out an impressive 232kW at the wheels. I loved this car, but for some reason, I moved it on. Possibly because it was my second one? I love the GRB hatch, but I think I have had my fun with them — see ya!

During my time at NZ Performance Car Magazine, I was exposed to countless new press vehicles. Hyundai flew me to Adelaide to drive their N range at The Bend Motorsport Park, Toyota gave me their GR Yaris, Corolla, and Supras to drive, and Honda invited me along to their Honda Civic Type R (FL5) press launch. 

During the Type R press launch, I was given the opportunity to drive an FK2 Type R, followed by an FK8, then followed by an FL5 — all to see how the turbocharged Honda platform has progressed over the years since its inception.

Unfortunately for my wallet, I was at a very pivotable point in my vehicle buying journey. I was interested in purchasing a GR Yaris, but I couldn’t justify the price they were going for in the used market at the time. I simply refused to pay $72,000 for a Yaris, which was considerably higher than the new price a year earlier. So, I was looking into other options.

My lego head when I realised this was the car for me!

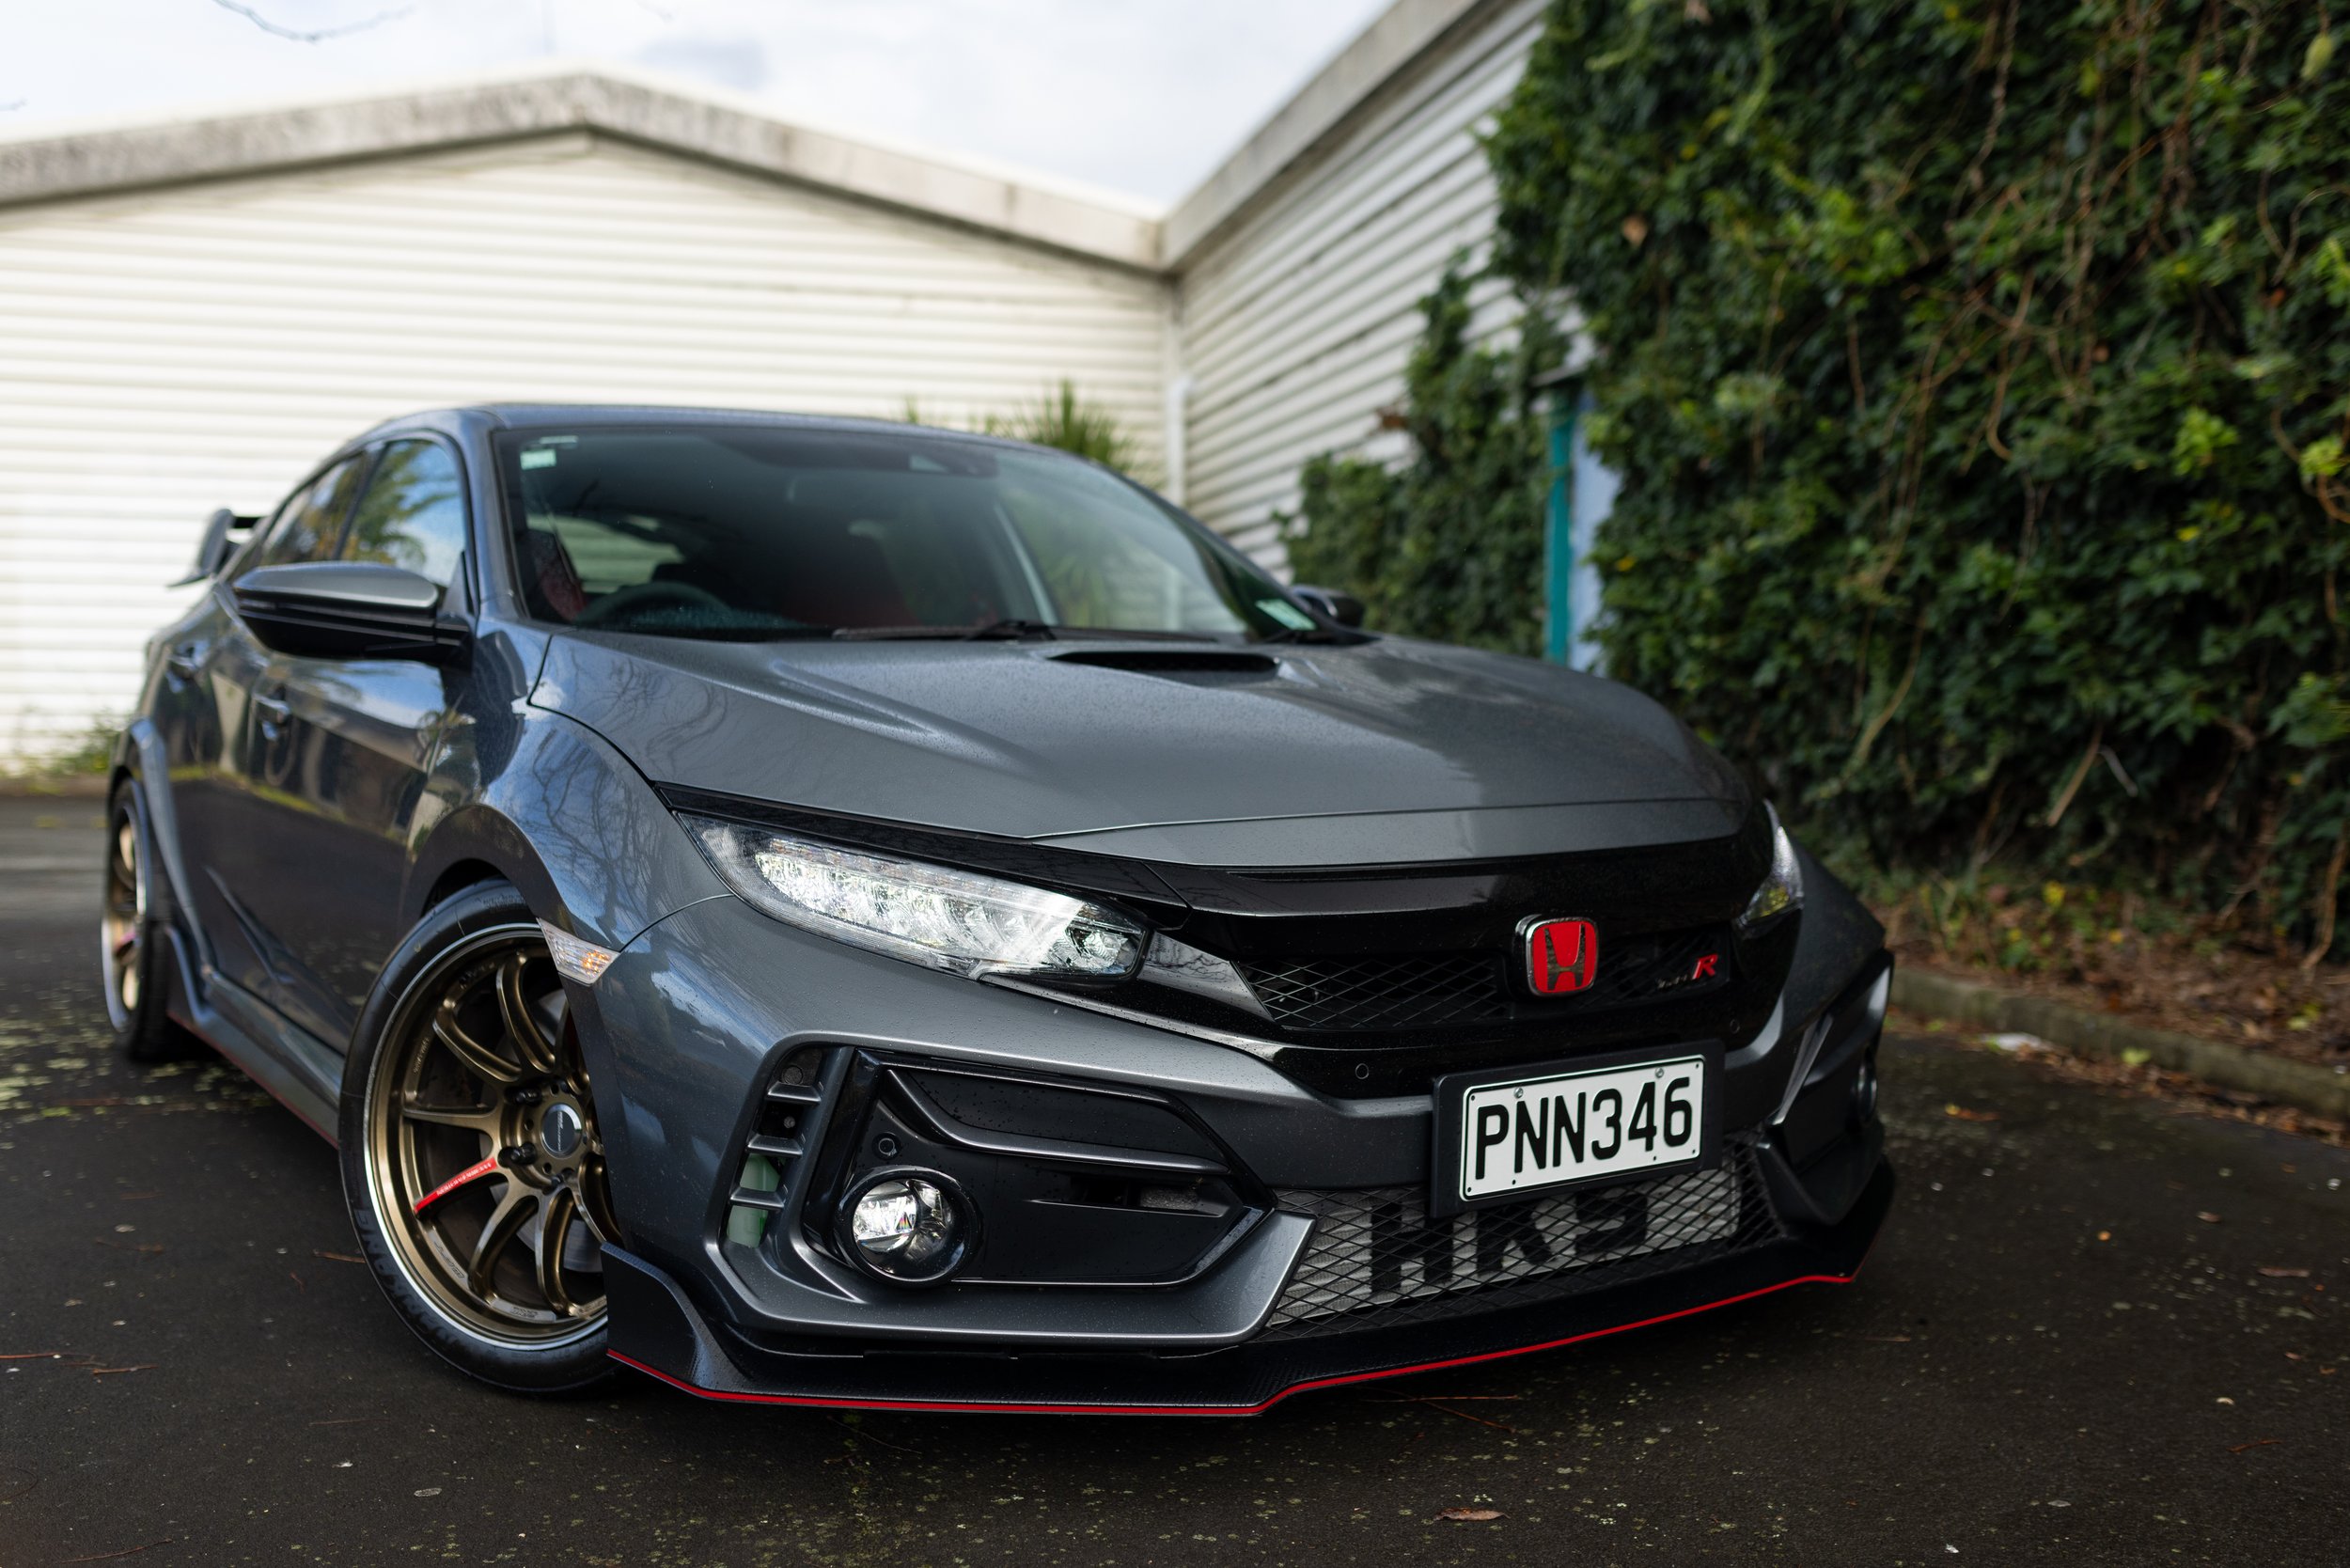
After driving all three Type Rs back to back, I was most impressed with the FK8. For one, it was a heap more compliant on track, it didn’t have as much fake engine noise, and when the FK8 and FL5 were parked next to each other in the pits the FK8 front end had me sold. Yeah, the back is kinda goofy, but the front is full-on, time attack-style aggression and I knew with a nice set of wheels it would look even cooler. I went home, scoured the internet and came across the vehicle I now can happily say I own.

The vehicle I purchased was a one-year-old, 2021 Honda Civic Type R with 4,400kms on the clock. I have never in my life owned a vehicle to this value, with kms this low. Driving it home felt like a dream — it was almost surreal. I know it’s just a Honda Civic, but having been a Honda enthusiast since I was a young teenager, this is peak Honda ownership. Say what you want about the styling, it demands your attention on the road and it’s an incredible cabin to drive in. It has features I always wanted in a vehicle; beautifully-made gear knob and shifter, Alcantara galore, red stitching, bucket seats, and ‘R’ badges everywhere. Epic.

It didn’t take long before I started modifying too. I told myself I would leave it stock for around a week before parts were ordered. Why are we like this?! Since I purchased it at the end of 2022, it has seen the track 4-5 times, makes around 270kW at the wheels, and has a total of 8,900kms. It’s safe to say, things escalated quickly with this ‘R’.

Stay tuned for the update blogs next, where I bring you up to speed on the fun I have been having with upgrades and on the track! 

categories: SA PROJECT BUILDS
Monday 04.15.24
Posted by Rene Vermeer
 

StreetattackR: Rodney finally gets new shoes!

 
“Well, it certainly has been some time between drinks! However, Rodney has new shoes so it was time for a photo shoot.”

I know, I know; it has been some time since I have posted here. To be honest, I have had a lot happening this year with my personal life, so photography, motorsport, and unfortunately the Altezza have all been pushed to the side. That doesn’t mean to say that I haven’t had a few side projects on the go, of course…

189A8768.JPG
189A8770.JPG

Rodney, my Altezza, was purchased for around $1500, with a blown engine, full of cigarettes, pills, and all sorts of other trash. It has been a project, that with the help of talented friends, we’ve been able to make something fairly decent out of it. However, with my love for BTCC and JTCC of the ‘90s, it wasn’t long before I started to want that styling.

Initially, I was running Mitsubishi Evo X wheels, as they’re a quality OEM wheel made by Enkei and they fit a nice 225 or 235-wide tyre. This sparked the touring car look, as they large multi-spoke wheels and sedan body were begging for more. After locating a touring car-style wing in Australia, I had it painted and installed — we were getting close!

189A8774.JPG
189A8776.JPG

Unfortunately, though, there was something missing. One thing that was missing was a lower ride height, but the true component missing was a set of motorsport-specific wheels and tyres. Enter, the Speedlines. After doing my usual Facebook marketplace daily check, I stumbled upon a VERY affordable, rashed, curbed and bent set of Speedline wheels, measuring 18x.8.5-inches (+34P) and 5x114.3 stud-pattern. They weren’t for sale long, as I snapped them up extremely quick.

Over the coming months, I had them painted by a good friend Andrew, and had the decals remade in TimeattackR red, instead of the usual blue or black that they normally come in, by Greg Martin of WRC Signage. Greg did an incredible job on the decals, matching the radius of the Speedline wheels perfectly. However, when Andrew went to paint the final wheel, we noticed it was incredibly bent. Knowing I would need an expert, as to not lose a set of wheels, I entrusted the job with the team at Brugar Engineering in Takapuna.

After leaving the wheel with them for a couple of weeks, I was incredibly happy to find out that they were able to repair it. It was straightened, welded, and balanced — then primered, ready for Andrew to work his magic with the paint gun.

To finish the wheels off, they needed a decent tyre. After talking with Dustin Ng of DNG Automotive, he told me he had a set of near-new Dunlop O3G tyres, measuring 225/40R18 — so I snapped them up!

After lowering the car another 10-15mm all round, I couldn’t be happier. In person, it has a real touring car stance. Next on the list, I need to sort the engine. It’s incredibly gutless as it sits, besides being a rev-happy two-litre engine. I plan on installing ITBs, a Link ECU and a set of tuned headers and exhaust system. This should give it a little extra boogy, while still sounding cool and being a reliable package. When I have some more updates, I will let you all know. Ciao!

189A8791.JPG
categories: SA PROJECT BUILDS
Sunday 11.03.19
Posted by Rene Vermeer
 

StreetattackR: Rodney gets parted out — bigger things coming!

 
“I know, I know; I’ve just built it? Why stop now?”

Rodney, the TimeattackR project car has been an incredibly fun project. From what started as essentially a rolling body, has turned into an enjoyable, yet capable street and track day car. Initially, it was mean to be a project in which I would spend as little as possible, to get out on the track and learn how to drive.

In a way, I did this, however I did spend a little more than first intended. Why? I had an idea of how I wanted it to perform and with each and every part available through my place of work, I thought it rude not too.

Now though, what’s going on? Why the blog? Well, as of last week, I have started to sell some pieces off the Altezza. At the end of next month, I have a trip to Japan planned for ATTACK Tsukuba, February 23. What this means is, I need extra money.

The trip was booked last minute with a good friend of mine, and I need to bring in some money to make it work. Before getting parted, though, I decided to take it for one last spirited drive with my friend Keegan and his 2JZ-GTE-powered Altezza.

What does this mean for Rodney? Every time I watch Japan Superlap Battle videos, ATTACK footage, or hang around of New Zealand’s local circuits, it makes me want to get the angle grinder out. Rodney is going to level up, to a lighter vehicle with a little more power.

After talking with a few people in the industry, my plans to turbo the Altezza diminished. One person in particular, Brendan Duncker of Convert Motorsport, told me tales of his 260hp at the wheels 3SGE engine in one of his previous drift cars, that would rev to 10,000RPM with tonnes of throttle response.

I don’t think I would be happy with the power the turbo engine would produce and the added strain on the driveline isn’t worth the risk to me at this stage. Maybe one day when I can do it properly, it will be done. I do still have the HKS F-Con ECU with plug and play loom kicking around, which is tuned for an NA setup — which should kick things off quickly.

So far, I have sold the Evo wheels and tyres. Next, will be the seats and GReddy turbo manifold. The seats will be replaced with lighter Racetech or Bride units and the wheels will replaced with either another set of Enkeis or Work wheels from Japan. I am excited about the next phase of the build, as for me, I enjoy the driving just as much as modifying.

For now though, it’s on stands until after Japan. Come March, I will be ripping back into it and ordering my favourite things of all time; PARTS!

categories: SA PROJECT BUILDS
Tuesday 01.22.19
Posted by Rene Vermeer
Comments: 2
 

StreetattackR: Project Rodney hits the circuit!

 
“Yes, it has been some time in the build, but I can finally say Project Rodney has had his first track battle. Over 300kms were completed on Bruce McLaren Motorsport Park”

Images: Damian Smuts

WOOHOOO! Finally, Project Rodney made its circuit debut. Held on September 28, I attended a casual track day held by a few close friends of mine, at Bruce McLaren Motorsport Park. For eight months or more with the help of numerous semi-eager people, I have been building Rodney up from what was essentially a rolling, stinking, cobweb-covered shell. To say I was excited for this day would be a serious understatement. The low-cost accommodation was booked, leave was grudgingly accepted by my superiors, and the track day was paid for.

We made our way down to New Zealand’s beautiful Taupo region the day before the track day to settle in and get a decent night’s sleep. Early the next morning, I was cleaning the Altezza before it hit the circuit, then we made our way out for briefing. Thankfully, we had the use of a pit bay, so my tools were unloaded, ready for action.

After driver’s briefing, we all made our way onto the circuit for an orientation session — for those not familiar with the circuit, it was a great time to learn the lines with experienced drivers on board. I went out with my dad, and good friends Damian Smuts and Alastair Wootten. Alastair is an incredibly talanted driver, having competed locally in our Toyota Race Series (single-seaters), Midget racing, Formula Fords, and most recently Trans Am in a 800hp Nascar-powered Corvette.

During the three-lap orientation session, the lines learned from Alastair were invaluable. But, the true knowledge would come through with just himself and me in the car during our first ‘hot’ session. With him behind the wheel to show me the ropes, I was blown away at the pace in which this shed-built car could go. No, it didn’t have great straight-line speed, but the braking and cornering were incredible. Having a seasoned racer behind the wheel that is used to far greater horsepower figures, I was waiting for the comments of how slow it was. Instead, Alastair complimented just how tight the car felt.

Alright, my turn! The rev-happy 3SGE engine propelled me out of the pit area and into the action. If I’m honest, I was actually a little nervous heading out with both an experienced driver in the passenger seat next to me and out on the circuit in other cars. Everyone gave me plenty of room to learn though, which I appreciated and Alastair helped as my eyes and ears as I concentrated on my lines, which calmed my nerves — there is a reason this lad was my best man; full trust!

With every lap, I gained serious time on the last. I have driven Bruce McLaren Motorsport Park before in my Subaru WRX, but this was a completely new experience. No longer could I rely on computer assists, all-wheel drive, and 22psi of boost pressure to haul me around the circuit in a decent time. This experience was the reason I sold the Subaru.

With so much track time on offer, Alastair and I switch drives throughout the day. The day ran as an open pit, so if you wanted to be out for an hour or more, that was up to you. Alastair and I were seriously impressed with the Zestino semi-slicks. With pressures set to 24psi in the pits, they would build to 24.5psi every time we came in. We found this to be the optimum for this tyre and they wouldn’t peak over 24.5psi. We couldn’t believe how consistent they were. Being a soft compound tyre, I was worried about having driven on them every day for three months prior to this event and the amount of track time I was getting, I wouldn’t have any tread left to get home. However, the wear was extremely good — I still have another track day in them at least!

Throughout the day, we made changes to the coilover damper. Initially, we started on the softest shock setting, slowly feeling our way through the day with how the car was responding. The Wilwood brake kit performed exceptionally. During one of the final sessions, I was out there for around 35-40 minutes with zero brake fade and a great deal of confidence. During that final session, I did notice the brakes not pulling up as well as the start of the day, which was frustrating. After closer inspection after leaving the event, I noticed I had used an entire set of rear Znoelli pads! They were brand new the night before the event… The Hawk pads up front? Still mint!

With the Altezza, I built the car basically all at once, so I didn’t get to feel each and every modification. Before the track day, I was basically set up, with Cusco coilovers, a Cusco rear sway bar, strut braces front and rear, the brake kit, wheels and semi-slicks. I was blown away with the handling on the street, but there was one addition I made to it before the event blew my mind so hard there was a serious clean up on aisle three; the front Cusco sway bar. Never in my life have I felt a vehicle handle so so flat through a corner. By far the best bang for buck mod to date.

I could talk about this track day forever, so I will leave it at that. I was very happy with the performance and reliability of the Altezza and it just goes to show if you choose the right mix of genuine components you’ll be out there for as long as you want. The Altezza completed just over 300kms on the circuit, which nearly 100 laps. I would like to thank Alastair for teaching me the lines and general track day things you need to know. It was great to get my dad out in the car too, and my good friend Damian, who I need to thank for photographing the day for us all.

What’s next for the Altezza? Well, it’s far too slow down the straights. I think it was probably the slowest car on the straights, but one of the fastest through the infield on the day. Either a turbo or something similar will be added next. Alastair managed a 1:49.2 around Bruce McLaren Motorsport Park, which is a whole heap quicker than I was going!

categories: SA PROJECT BUILDS
Thursday 10.25.18
Posted by Rene Vermeer
 

StreetattackR: project Rodney gets new seats and brakes!

“Finally, some serious progress! Project Rodney gets new brakes and preparation for certification”

I had a very clear vision of what I wanted this build to be when it was first purchased last December. I wanted an affordable street legal track hack, that I could beat on all day without any issues arising. For this to happen, I knew a few things would need to be over-engineered, and that the engine would remain as factory as possible. I also wanted the upgrades to be genuine parts, or OEM wherever possible. This led to the decision to run OEM Mitsubishi Evo X Enkei wheels, and the hunt then began for factory-released Recaro seats from the late '90s and early '00s. 

One of the first things on the list to do before the new seats were installed was replacing the disgusting carpet. The previous owner was a heavy smoker, and I have never seen so much durry droppings! There was no hope of cleaning it up, so I found a fresh carpet out of a wreck. 

Having the carpet out meant we could tidy a few things up and install the seat belt buckle mounts for the certification. Although my new seat rails have seat belt mounting points, LVVTA certification requires them to be mounted to the tunnel of the vehicle. 

Seats! I love a good seat, however, my budget was starting to look a bit grim for anything decent. A Racetech or Bride seat supplied through work was the original plan, but I figured I would start looking for a second hand Recaro SR3 driver's seat instead to keep costs down. I managed to find the Recaro on the left-hand side of this image for $215, and then just before certification, I picked up the seat on the right for $200. They don't match, but I couldn't pass them up! 

Then, once that was all done, my flatmate Damian and I installed the front lip to tidy the front-end up a bit. I'm keeping all these photos fairly vague mind you, as I will be doing a proper photo shoot in due course! 

Alright, time for seriously cool shit. At the start of the project, I would have everyone on at work that I would be installing our off-the-shelf Wilwood SXE10 brake kit. The kit consists of JZA80 Supra 323mm discs, Wilwood Superlite four-piston calipers, stainless brake lines, and MRP Ltd caliper mounting brackets. I wasn't joking, I had been eyeing this fine piece of kit up since the get-go... Install time! Thankfully, I roped one of the Toyota technicians at work to give me a hand. 

Wheels off, discs removed, and brake lines clamped. Now to check out what comes with the kit and remove the original caliper. 

In the photo above you can see the new caliper sitting next to the cast-iron OEM units. Boy, the stock ones are HEAVY! Both new Wilwoods wouldn't weigh as much as one single OEM one. Even if they had the same braking power, the un-sprung mass difference would be worth it alone. Also, they don't look rubbish. 

Before we could proceed though, the MRP Ltd caliper mounts needed to be installed. This bolts up to the existing caliper mounting points and spaces out the Wilwood caliper to the right location for the new 323mm disc. Fitting hardware is included, so it's extremely straight forward. 

A quick dummy-fit of the new disc shows how much bigger the new disc is... The excitement at this point is, ah, like a lot. 

Before I could mount the calipers, I had to read the instructions. RIGHT AT THE BEGINNING IN BOLD RED WRITING, it states that the 10mm caliper mounting holes need drilling out to 12mm. Believe it or not, this took me some time to figure out... I really should read the instructions first before assembling things. Believe it or not, not one technician at work had a 12mm drill bit, so off I went to the hardware store to pick one up. 

Oh baby, they're gorgeous. The Wilwoods are mounted and looking better than I expected. Now time to rip into the rest of the conversion. The kit included Hawk Performance pads, which should be great for my application.

With everything else laid out ready to go in an unorganised chaos, we reached for the brake lines. These required a little bit of fiddling around to ensure the S-bend was the same as the factory line, so they didn't foul on any suspension components. 

All fitted up, the Hel brake lines looked nice and should improve braking feel a great deal. 

The final step in the oh-so-easy process is the brake bleed with new TRD race fluid. This is made incredibly easy by a vacuum-bleeder. Top 'er up with fluid, and hit the go button! The calipers did require a manual bleed at the end to get them over the line, but damn his makes life easy. 

All done! The Wilwood calipers had oodles of clearance behind the Evo X wheels, which have a Brembo behind them from the factory. Initial test-drives indicate a massive improvement in both feel and force, but the true test will be on the track. It's all coming along, and I can't wait to get this thing out on track in the coming months. The next time you see this car on here, it'll be a much closer look at everything. 


categories: SA PROJECT BUILDS
Monday 06.04.18
Posted by Rene Vermeer
 

StreetattackR: project Rodney is up and running!

 
“It has been a while in between drinks, but finally project Rodney has an engine, and — it’s running! Plus, we installed an array of Cusco suspension components!”

Last time on project Rodney, we took ownership of a 2004 Toyota Altezza SX10, factory-fitted with a 3SGE four-cylinder two-litre engine punching out 207hp from the factory and a six-speed manual gearbox. However, this example was definitely not putting out anywhere near that thanks to a serious rod-knock and crank walk, so we pulled the engine for inspection. 

With the engine removed, it sat for months. As many others will know, life gets in the way and the hunt for a replacement second-hand engine took what seemed like years. Thankfully, with a great group of friends on the case, a 100,000kms engine was sourced through Te Puke Partsworld, and delivered to my workplace; North Shore Toyota Parts. 

During this time, I had on order a set of Cusco Street Zero A coilovers from Japan with custom spring rates to suit the track-day and road driving I’ll be doing. To complement these, I ordered a Cusco rear sway bar and front strut brace. While waiting for all of that to land, I managed to score a rear GReddy strut brace off of a workmate for a good price — awesome!

One special Saturday, it all came together. I had work until midday, but when I arrived at Nick’s place where the Altezza has been kept, the Exedy Hyper Single had been bolted on and the gearbox fitted. The dream-team had even hung the engine on the crane and had it ready for installation! 

By 5 pm, we had the engine in, the cooling system completed, and the exhaust system fitted. It had rained on and off throughout the day which wasn’t nice, but we were so close to having it running. 

“I wonder why it won’t start?” I said to Nick after the jump-pack was connected and we’d cranked it over numerous times. “Sounds like it’s out of gas!” Nick said, laughing. Right as rain, the fuel tank was empty! A quick dash of fuel and the Altezza fired into life! The engine sounded extremely smooth too. Fluids were topped up, the bumper was installed and we called it a day. 

The next morning, I collected the Altezza and drove it home hassle-free. The Exedy Hyper-Single clutch bites nicely and the six-speed gearbox provides an extremely ‘sporty’ feel. Even in stock form, the handling wasn’t bad at all, however, the very next day I had very big plans in that department…

With the help of my good friend Damian, we stripped down the suspension from the Altezza and to be honest, it was a total pain in the arse. The rear shocks and springs were a real pain to remove, but in no time at all, we had them removed ready for the Cusco shocks. 

The new much shorter units were much easier to install. You just can’t go past the build quality of Cusco! 

Once the coilovers were fitted, we installed the rear sway bar and bolted down the front strut brace — everything done in three hours! We took the Altezza out for a quick street test through some local twisties and WOW! The handling already is so much sharper and flatter. It’ll be interesting to see how it handles after a proper alignment and with the Zestino semi-slicks fitted. 

There’s still plenty more to go with this project but we’ll save that for another episode as there a few more things we need to line up. I have purchased a seat, wheels, and tyres so they’re up next! Thanks for reading team. 

categories: SA PROJECT BUILDS
Wednesday 05.02.18
Posted by Rene Vermeer
 

StreetattackR: goodbye Subaru, hello Toyota

 
“After making the tough choice to sell the Subaru, Editor René started the hunt for a cheap track hack. But, with a budget under $2000 what did he manage to find?”

It’s always a sad time selling your pride and joy. The Subaru WRX STi was just that for me, and the day it left my hands, I wasn’t the happiest lad. With Subaru WRX books still occupying the coffee table, and ‘previously watched’ Subaru related content reappearing on my social news feeds, it was hard to move on. That was, though, until I found my next project. 

The criteria for the new project was simple. It had to be extremely cheap, as my prime focus at this point in time is getting my rear-end into a bucket seat, and learning how to drive properly. With a budget set for $2000 for the initial purchase price of the vehicle, I had my goal. Every morning I would scour Trade Me to find the next deal, and, one day while I was painstakingly scrolling, one of the service advisors came up to me and said, “do you want a cheap Altezza?”

After taking a quick look, it was evident why it was so cheap — a  2004 3SGE six-speed manual Altezza had to have something wrong for it to be $1500. I started the engine, and was greeted with a symphony of rod-knock. “I’ll take it!” I told the service advisor.

After removing the previous owners sound system at work, I made the awkward and noisy drive to my manager's place where Keegan, Nick, and I would begin to remove the engine in preparation for something much fresher, which I still haven’t found yet. With only 150,000kms on the body, a fresh WOF and rego, a factory 4.3:1 LSD, and the six-speed manual gearbox, it’ll be an affordable blast when it’s going. The best thing is, my father Harold is doing it with me!

With the car at someone else's place, I will update progress as we make it. In the background, I have ordered Cusco Street A coilovers from Japan with custom spring rates, and have been in talks with Nan Su at The Bling Company about a wheel and tyre package to get us out on the track with. Hopefully, before long, I will be out there on the track, and potentially, getting carried away with modifications. Here’s hoping! 

As you can see, the engine is far from just needing a new set of bearings — she's toast! We removed the sump, only to find this mess on the pickup. Initially, we were hoping to freshen up the bottom end, however, I think this 3SGE is more suited to being a boat anchor for someone.... If you know of anyone selling a cheap 3SGE send us an email, or comment below! 

categories: SA PROJECT BUILDS
Monday 01.29.18
Posted by Rene Vermeer
Comments: 4
 

StreetattackR Project: introducing the new LSM streeter

 
“With a long history with his championship-winning Mitsubishi Evo, Leon Scott wanted to build something he could drive on the street and take on the odd round of local time attack racing”

Well, we most certainly weren’t expecting this! Leon Scott strikes us an extremely staunch Evo fan after owning his time attack circuit car for nearly a decade, so when we got the call telling us he’d bought something to drive on the street, we were a tad confused. An exchanging of images later, and what Leon had built was him down to a tee, however, it had a rotary engine between the strut towers; a 2003 Mazda RX-8 Type S.

View fullsize 0Y5A9551.jpg
View fullsize 0Y5A9625.jpg

For what looks like a relatively attack-specific car, it’s actually reasonably factory and has a warrant of fitness, a registration, and an engineer's certification at its current ride height. To give it a unique style, Leon fitted 18x9.5-inch and 18x10.5-inch Work Emotion Kiwamis wrapped in Advan Neova rubber up front, and cheap road tread down the back to pass certification. “I have got some more Advan tyre on order for the rear through my sponsor Hyper Tyres,” Leon told us.

View fullsize 0Y5A9592.jpg
View fullsize 0Y5A9622.jpg

Custom Tein coilovers built by Ian at Autolign, Whiteline sway bars, and braces complete the subtle handling package and give it an aggressive appearance — as does the custom white wrap job by Signwise. The Mazda still wears the factory brake calipers, but now features high temp Endless MX72 pads, stainless lines, Endless brake fluid, and slotted and drilled discs which should be more than enough for the application. “During the certification process, the engineer told me that it’s the best braking RX-8 he has come across during the process,” Leon added. 

View fullsize 0Y5A9617.jpg
View fullsize 0Y5A9619.jpg

Under the bonnet, you’d be a fool if you thought the factory engine remained. Well, it kind of does, however, has just been rebuilt with Unbreakable seals, a custom Gilmer drive kit, a three-inch intake kit with foam unifilter and carbon airbox, stainless steel headers, a remapped Maztech ECU, and has been balanced and doweld. Once run it should see 9000rpm with ease and produce around 280hp at the wheels, thanks to a serious bridge-porting. To back the Mazda six-speed gearbox Leon went with an Exedy race clutch with lightened flywheel.

Inside the cabin, it’s all stock for now. A Tech race dash is ready for installation, and Bride seats with head restraints are sitting in the garage ready to go. For now, though, Leon’s enjoying the tidy Mazda interior on the street. 

We’ll be following this build as it progresses, so as always, keep your eyes peeled for the next update! 

View fullsize 0Y5A9582.jpg
View fullsize 0Y5A9596.jpg
View fullsize 0Y5A9620.jpg
View fullsize 0Y5A9651.jpg
View fullsize 0Y5A9661.jpg
View fullsize 0Y5A9683.jpg
View fullsize 0Y5A9685.jpg
View fullsize 0Y5A9688.jpg
categories: SA PROJECT BUILDS
Sunday 10.01.17
Posted by Rene Vermeer
 

StreetattackR Project: why I sold the Honda and bought a turbocharged Subaru

 
“Uh-oh! I’ve done it again; but this time, it’s for the better. A brand new TimeattackR.com project, but this time with BOOST!”

If you’re a follower of mine on social media, you’ll know that late last year I purchased a 2000 Honda Accord Euro R (CL1). This Accord was it, the project to end all projects. That was until I felt a lust for boost pressure, gorilla-like grip, and something with opposing cylinders. To be fair, I was in the market for a Nissan Skyline GT-R R33, but they’ve  reached astronomical prices lately and they’re getting pinched faster than I see them for sale. I didn’t want to purchase my dream car only to have it stolen months, weeks, or even days later — maybe it is best to never meet my childhood hero? Who knows. All I know is, the Subaru WRX STi (GRB) for 10–15-thousand dollars less a GT-R was fantastic value for money. Oh, and I can fit the doggo in the back — win-win! 

So, what exactly did I purchase? The Subaru I now own is a 2008 Subaru WRX STI (GRB chassis). From the factory, the two-litre variant (JDM model) boasts 228kW and 422Nm of torque — that’s as much as a 2JZ-GTE! With equal-length factory headers, a twin-scroll VF43 turbocharger and more boost than the New Zealand new model, it’s a rocket ship waiting to take off, and it doesn’t sound as though it’s from the Subaru family. 

This particular example will be a combination of my track day/touge monster and weekend cruiser that my wife can drive. It came with a few cheeky upgrades too, which was one of the main reasons I purchased it. It had been built properly down in Christchurch by James Marshall Motorsport. James Marshall is well known in racing circles all around the country, and this particular example was built for his wife to drive. 

View fullsize 0Y5A3845.jpg
View fullsize 0Y5A3848.jpg
View fullsize 0Y5A3851.jpg

Handling wise, the WRX features Blitz coilovers which are platform height and damper adjustable. Engine wise, the EJ20 has been tickled with a reflash and now runs 1.5-bar of boost (around 20psi), has a turbo-back HKS exhaust system, which includes front pipe, mid-section, and rear mufflers. On the intake side, the factory intercooler remains, but the turbo now breathes much better thanks to the HKS Kansai carbon fibre air box and intake kit. 

A few aesthetic enhancements have been made to it too; a set of 18x9.5-inch (+30) Work Emotion Kiwami wheels were fitted by the previous owner, and an electronic Defi boost gauge with a controller was fitted. Wanting to create my own look for the car, I have on order a set of 18x9.5-inch (+30) Work 11R wheels in gloss black on order from Work Wheels in Japan which are due to arrive in the next week or so. Currently, the WRX is rolling on 245/40R18 Neuton tyres which are absolute garbage as I found out on Taupo’s Bruce McLaren Motorsport Park at a Club Sub track day, as are the factory brake pads and fluid. 

View fullsize 0Y5A3836.jpg
View fullsize 0Y5A3839.jpg
View fullsize 0Y5A3854.jpg

To remedy this, I have sitting on my desk at work a set of Project Mu B-spec high-temp pads for the factory Brembo calipers, braided Hel brake lines all round, and DBA T2 slotted rotors, which once fitted, should pull the WRX up time and time again out on the circuit. To combat the rubbish tyre issue, I have ordered a set of 235/40R18 Zestino 07R semi-slick tyres, which will be fitted once the Work 11Rs arrive. 

It’s been all go since I purchased ‘Rex’, but it has been nice to have a car I am passionate about spending oodles of time and money on again. Once the Possum Bourne baffled sump goes in, the tyres are fitted, and the brakes installed, it’s ready for the circuit. I can’t wait! 

Next time: I have the tyres fitted to the Work 11R wheels!

categories: SA PROJECT BUILDS
Thursday 05.11.17
Posted by Rene Vermeer
 

StreetattackR project: JP's soon-to-be turbo Euro R


Throughout life, you stumble upon people that make an impact — whether good or bad, they're embedded in your memory for a lifetime. Jon-Pual Ferguson (JP) is one of those guys for me, as I met him over a decade ago. He was always into Hondas, and after straying towards RB-powered vehicles for a couple of years and getting in trouble with the law, he made the switch back to Hondas. After owning DC2 Integras, EG Civics, and more, JP decided to pursue his love for four-door tin-tops and purchased an off-the-yard Honda Accord CL1 Euro R for a cool $18,000. 

Pearl white in colour and with a factory H22A red-top engine with close-ratio gearbox, it was modified soon after purchasing. Unfortunately, though, the car was stolen and recovered, so for JP it was never the same. This prompted a change in direction toward the circuit, a new paint scheme, and some more upgrades. 

JP's idea for the CL1 was to be a simple, reliable, and well-rounded track day car. The factory brakes were binned in favour of some AP1 S2000 rotors, which are clamped down by Integra DC5 Brembo four-piston calipers. For pads, JP opted for Endless and picked them up pretty cheap during a recent trip to Japan. 

After running a trick set of HKS Hipermax coilovers for a few years with great success, JP managed to score a set of Aragosta coilovers. He snapped them up in no time at all and tells us they were an impressive upgrade over the HKS units. For rigidity, JP installed CL7 Accord sway bars which suit his driving style and allow the pitch and roll he likes on the circuit. JP crafted his own splitter up front and produced some moulds for the carbon fibre canards (yes I'll be pinching the moulds!). Ultra Racing strut bracing front and rear reduces strut tower flex and as the car sits, JP is happy with handling and braking. 

What JP isn't happy with though is the engine setup. With plans to take on the Prowear NZ Superlap Series JP wants a heap more power, and that power will come in the form of a single turbocharger. With a goal to hit 260kW on a moderate boost setting for reliability, JP has opted to ditch the H22A engine and utilise an F20B engine from the Accord SiR. As they're an affordable unit, the F20B will be built with custom forged K20A pistons to handle the boost pressure JP soon to come its way.

"The F20B purely exists for motorsport reasons, " JP continues; "Honda needed a competitive two-litre engine for touring car racing, so the H22A was de-stroked. Having a shorter stroke it can handle revs much better than the H22A, and with boost, I won't notice the smaller capacity." The best thing about using the F20B is you can pick them up online for a couple of hundred dollars! 

This is a build we're excited to see completed as JP is a serious Japanese time attack and racing enthusiast, and with a day job at Convert Motorsport, he knows how to build cars right. As the build progresses we'll keep you updated! 

categories: SA PROJECT BUILDS
Wednesday 12.28.16
Posted by Rene Vermeer
 

StreetattackR Project: David's 3SGE Beams Carina


Introduction
Hey, my name is David Van Der Haas. I’m not a very good spectator, I feel frustrated if I am not part of the fun. So going to speedway etc as a kid, stuck on the sidelines… This didn't interest me so I didn’t really understand the appeal of cars.

When I got my license, though, everything changed! Having a car with a full tank of gas gave me a sense of freedom like nothing else I’ve experienced. Things escalated from there, now I’m the “car guy” of the family, haha.

Why did you choose the Carina?
I previously had a more modern vehicle for track days, which I found very frustrating to work on. Many jobs required the whole engine out in order to remedy a reasonably simple issue. 
Or, you needed an arm with three elbows in order to undo that last bolt. This made fixing things while at the track an unpleasant experience, if not impossible.

Switching to a front engine RWD chassis, means a lot of these tasks are now very simple. 
This means more time on the track and less time on the sidelines. An older car made sense to me, as they’re generally smaller and lighter than modern equivalents. 

What upgrades and work has been carried out to the Carina?
It started life with a four-speed gearbox and a 3AU engine (single-cam carbureted 1.5-litre engine). It also had a lot of rust, haha! Every removable panel from the car was binned due to rust. The actual shell of the car was a good starting point, though, so it got a panel and paint after some better panels were found.

It’s now gone to a more modern twin cam two-litre engine, six-speed gearbox, and it has some more modern tricks up its sleeve. As well as much better suspension and brakes etc. 
I’ve spent a lot of time fine tuning the suspension to get it handling nicely at the track, while still being nice on the road. There’s been a lot of trial and error on nearly everything to get to this stage where it’s handling nicely and has decent reliability.

 
What class/event do you wish to take part in?
Street Class, Prowear NZ Superlap series. 

Images: David Van Der Haas

Vehicle: 1983 AA60 Toyota Carina Coupe
Engine: Rebuilt and balanced VVT-i BEAMS 3SGE engine from a Gen 5 SW20 MR2, 11:1 pistons, ported head, 440cc inboard/1000cc outboard injectors, Link G4+ Xtreme running E-throttle, launch control, cruise control, staged injection, knock sensing, 100hz data logging, Aim LCU one wideband controller, modified 4-2-1 HKS headers, 2.5-inch mandrel bent exhaust, 8200rpm rev limit
Driveline: TODA Chromoly flywheel, Exedy heavy-duty clutch, Altezza six-speed gearbox, F-series diff setup from an MA40 GT Celica, Cusco one-way LSD set to mildest settings
Suspension: AT141 Corona struts converted to Coilovers, 6kgmm front/3.5kgmm rear springs, Cusco camber tops, T3 rose-jointed castor arms, T3 RCAs, custom front swaybar, Whiteline rose-jointed Panhard rod
Brakes: (Front) Nissan R33 four-pot calipers, Citroen Xantia Brembo discs with Ferodo DS2200 pads (Rear) Nissan P11 Primera vented discs, Facelift SW20 MR2 rear calipers Wilwood bias valve
Wheels/tyres: 15x7-inch (-2mm offset) Impul ProSpoke, 205/50R15 Advan AD08Rs
Interior: Full interior, apart from sound deadening removed, factory dash cluster gauges converted to digital input and recalibrated to work with a more modern engine
Power: Estimated 130kW (at the wheels)
Lap times: 1:21.7 at Hampton Downs on Advan AD08R

categories: SA PROJECT BUILDS
Thursday 07.21.16
Posted by Rene Vermeer
 

Contact us